Remesh example: Stanford bunny
The Unit sphere page uses an analytic sphere, whose constant
curvature makes uniform and adaptive sizing behave almost identically. Here, we
work a second, more realistic example: the Stanford bunny, a scanned surface
with sharply varying curvature (ears, folds, paws) and, like most raw scans, a
few holes. It shows how every remesh parameter behaves on a real mesh.
The Stanford bunny is a classic computer-graphics test model, originally scanned by Greg Turk and Marc Levoy at Stanford University in 1994.
Download
The mesh used here is the cleaned bunny from Alec Jacobson's community
common-3d-test-models repository:
- ⬇
stanford-bunny.objfrom Alec Jacobson's repository (OBJ, 69,451 triangles)
remesh reads binary STL, not OBJ, so convert the downloaded file once with
the obj_to_binary_stl.py helper (shown at the end
of this page), producing stanford_bunny.stl. All commands on this page use that
converted file.
python obj_to_binary_stl.py stanford-bunny.obj stanford_bunny.stl
The input mesh
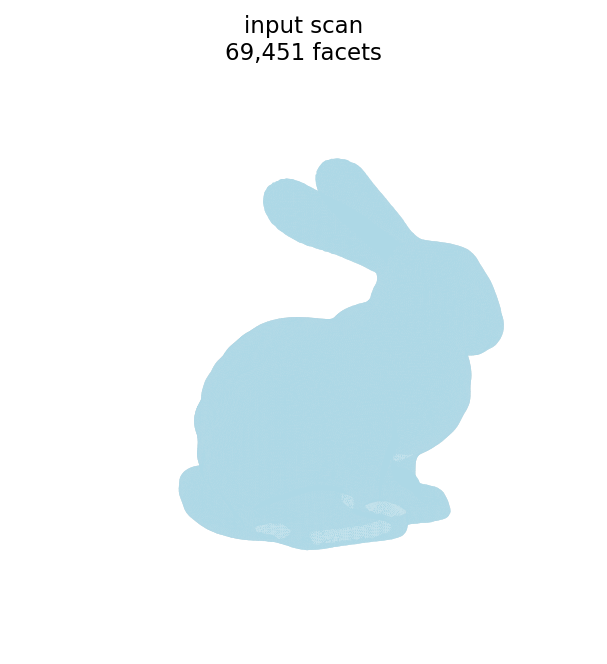
| quantity | symbol | value |
|---|---|---|
| facets (triangles) | 69,451 | |
| points (vertices) | 34,834 | |
| edges | 104,288 | |
| boundary loops (holes) | 5 |
The triangle edge lengths of the scan cluster near a mean of ≈ 0.0015:
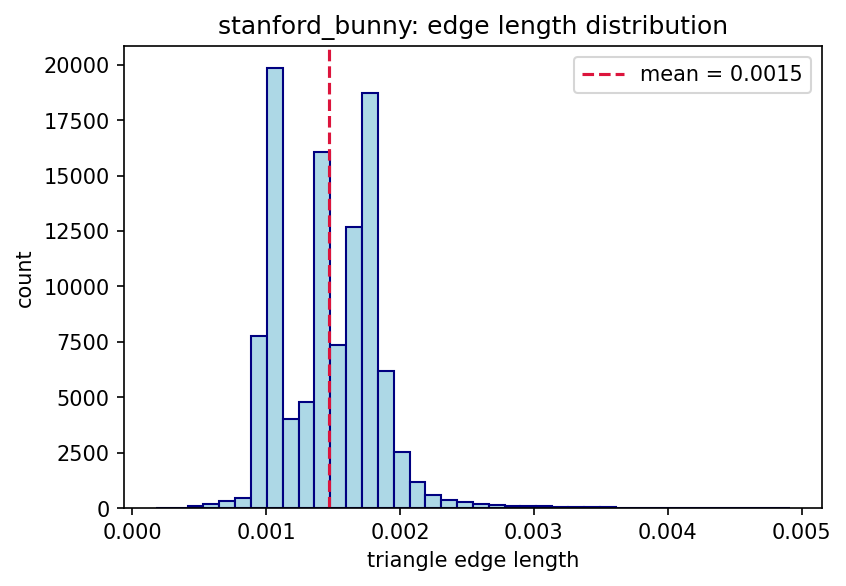
Unlike the sphere, the bunny is not watertight. It is a single connected, manifold, genus-0 surface, but it is open: the base has five boundary loops (holes) left by the scanner. Consequently the closed-surface identities from the sphere example do not hold here:
- is odd, whereas a closed triangular mesh requires and therefore an even facet count.
- The Euler characteristic is (equivalently with genus and holes), rather than the of a closed sphere.
Remeshing handles the open surface without trouble; the boundary loops are preserved through remeshing.
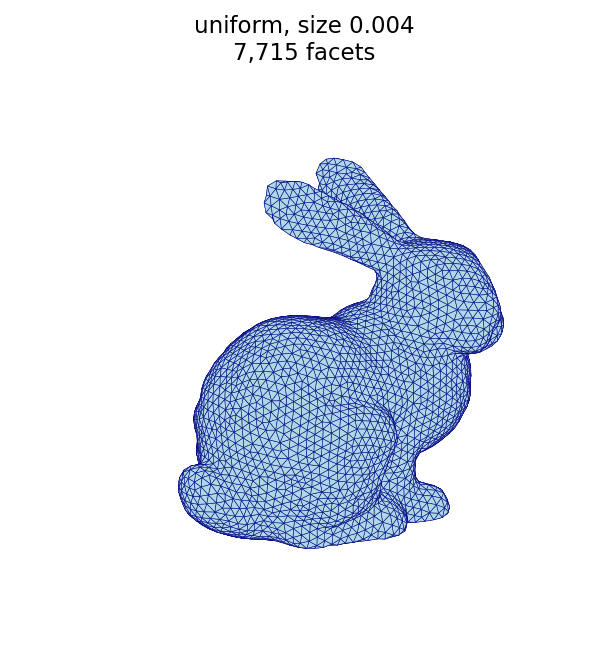
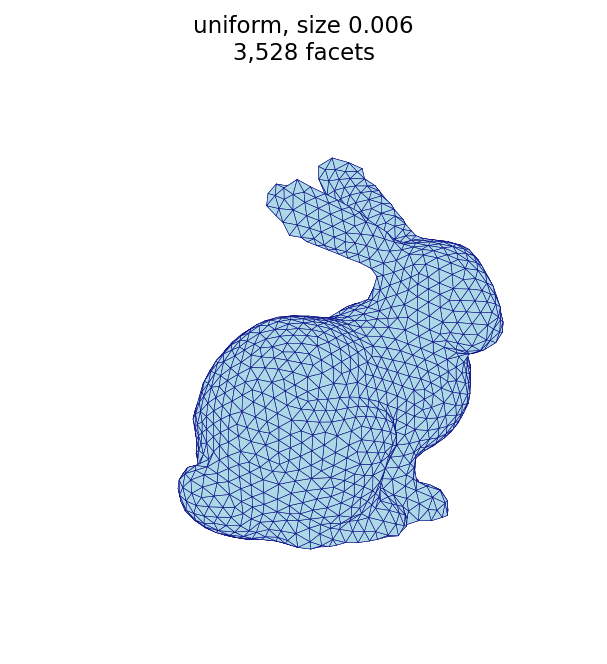
Uniform sizing (--size)
The target edge length sets the triangle size. A smaller --size produces more,
smaller triangles; a larger --size produces fewer, larger triangles.
automesh remesh -i stanford_bunny.stl -o bunny_uniform_fine.stl   uniform -s 0.004 -n 20
automesh remesh -i stanford_bunny.stl -o bunny_uniform_coarse.stl uniform -s 0.006 -n 20
fine, -s 0.004 (7,715 facets) | coarse, -s 0.006 (3,528 facets) |
|---|---|
 |  |
Iterations and coarsening (--iterations)
The bunny highlights an effect the sphere did not: coarsening a fine mesh to a
large target edge length is iteration-limited. Each pass can only collapse
edges so much, so reaching a coarse target from a dense input takes several
passes. At the same target -s 0.006, five iterations barely coarsen the
69,451-triangle input, while twenty iterations reach the target:
automesh remesh -i stanford_bunny.stl -o bunny_iter_n5.stl        uniform -s 0.006 -n 5
automesh remesh -i stanford_bunny.stl -o bunny_uniform_coarse.stl uniform -s 0.006 -n 20
-n 5 (29,826 facets) | -n 20 (3,528 facets) |
|---|---|
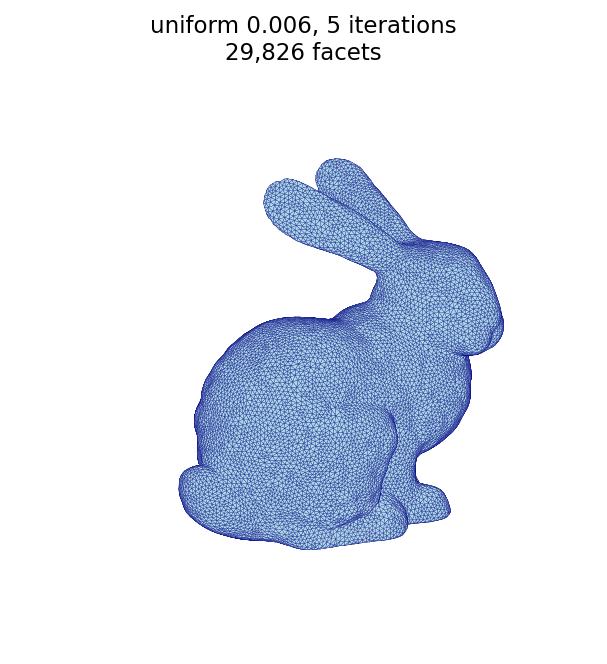 | |
This is the opposite regime from the sphere, where the input was already near the
target and five iterations sufficed. When coarsening a dense scan, increase
--iterations.
Uniform vs. adaptive
This is where the bunny differs most from the sphere. Because the bunny's curvature varies, curvature-adaptive sizing produces a visibly different mesh from uniform sizing at the same triangle budget: adaptive keeps small triangles on high-curvature features (ears, head, paws) and enlarges them on the smooth flanks.
A wide edge-length spread (--minimum 0.002 --maximum 0.040) with a low
--tolerance accentuates this: only the highest-curvature regions are refined to
the minimum, while everything smooth relaxes toward the maximum.
automesh remesh -i stanford_bunny.stl -o bunny_compare_uniform.stl uniform  -s 0.0036 -n 20
automesh remesh -i stanford_bunny.stl -o bunny_adaptive.stl        adaptive --minimum 0.002 --maximum 0.040 -n 25 -t 0.02
| uniform (9,541 facets) | adaptive (9,698 facets) |
|---|---|
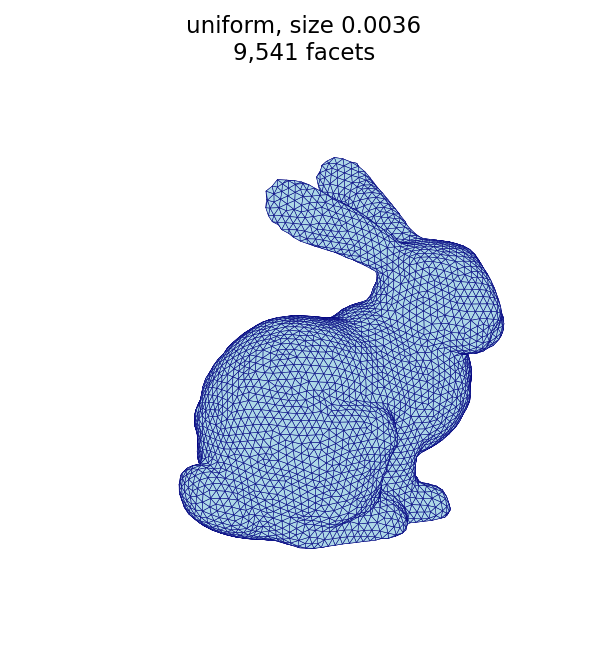 | 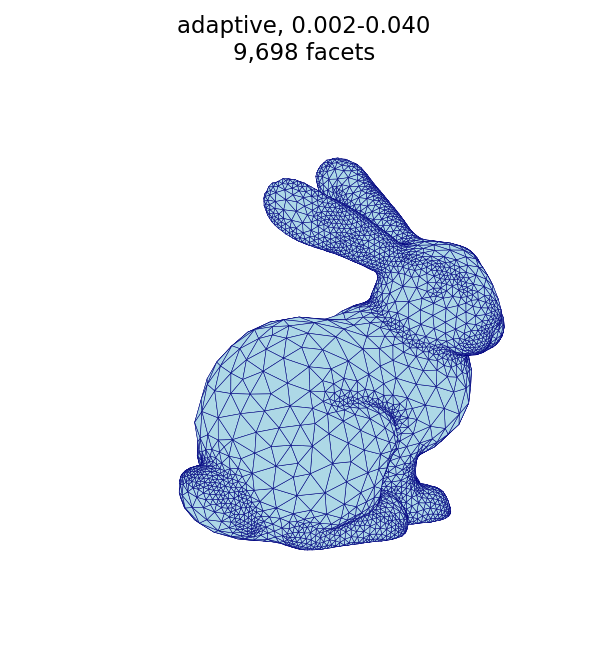 |
Both meshes use a similar number of facets, but adaptive spends them where the surface bends most: the ears, head, and paws are finely triangulated while the smooth flanks and haunches are left coarse.
Adaptive curvature tolerance (--tolerance)
The tolerance sets the target edge length through the
Dunyach sizing formula1,
as implemented in the conspire Rust
library2 on which automesh is
built:
where is the tolerance and is the local surface curvature (flat regions, , take the maximum edge length).
Its effect on the facet count is not monotonic — and this is the part that is
easy to get backwards. Sweeping the tolerance at fixed
--minimum 0.002 --maximum 0.040 -n 25 gives a U-shaped curve:
automesh remesh -i stanford_bunny.stl -o bunny_tol_tight.stl adaptive --minimum 0.002 --maximum 0.040 -n 25 -t 0.0002
automesh remesh -i stanford_bunny.stl -o bunny_tol_mid.stl   adaptive --minimum 0.002 --maximum 0.040 -n 25 -t 0.002
automesh remesh -i stanford_bunny.stl -o bunny_tol_loose.stl adaptive --minimum 0.002 --maximum 0.040 -n 25 -t 0.02
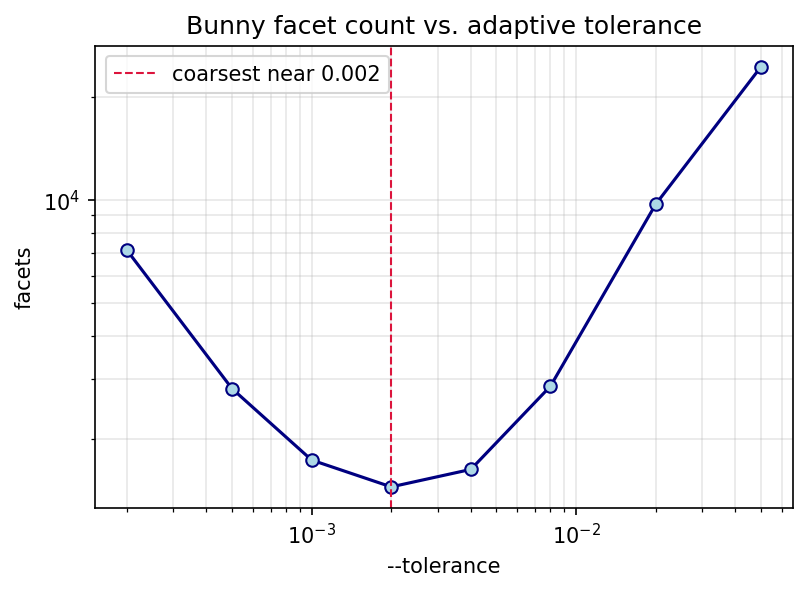
Both very small and very large tolerances refine the mesh; the coarsest result is in between (near here):
tight, -t 0.0002 (7,133 facets) | moderate, -t 0.002 (1,452 facets) | loose, -t 0.02 (9,698 facets) |
|---|---|---|
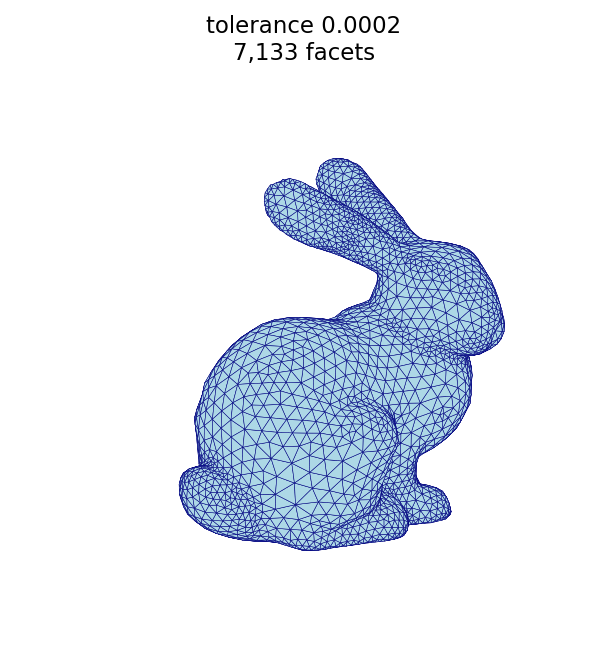 | 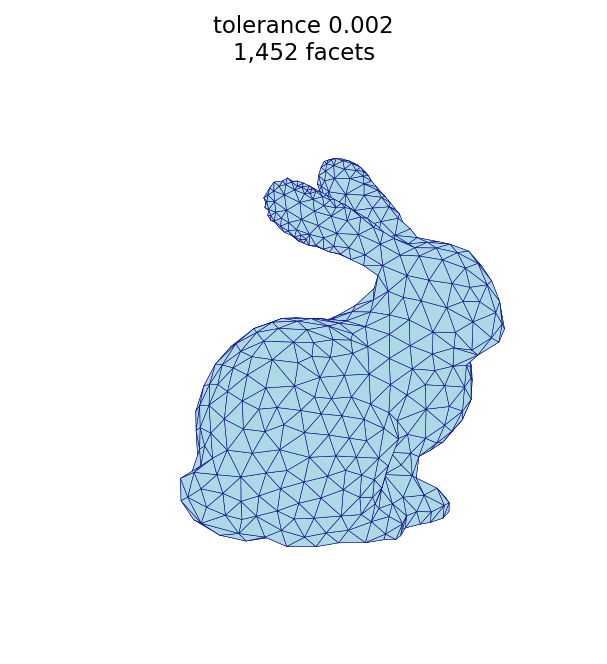 | 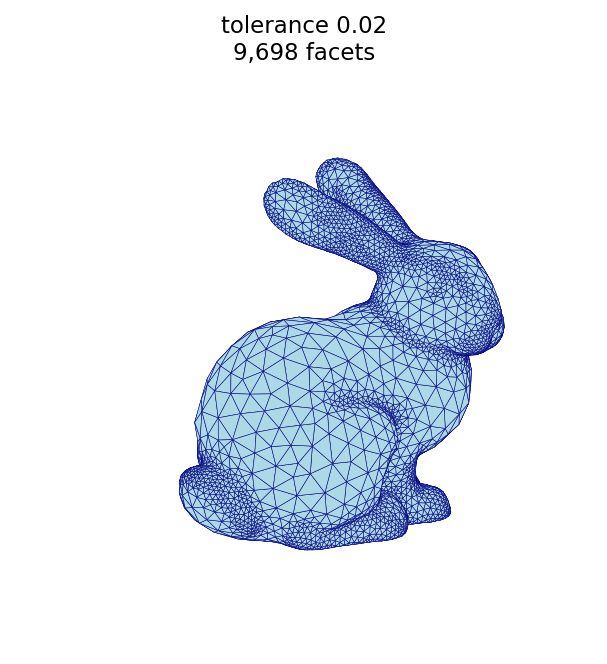 |
Why the U shape? The tolerance acts as a curvature cutoff : regions sharper than clamp to the minimum edge length, while flatter regions follow the formula above.
- Small (large cutoff): few regions reach the cutoff, but the formula itself returns short edges wherever curvature is nonzero, so the mesh is fine.
- Large (small cutoff): the term drives the argument negative over more of the surface, so more regions clamp to the minimum — the mesh is fine again.
- In between, most of the surface sits in the formula regime at moderate edge lengths, giving the coarsest mesh.
In practice, sweep the tolerance for your surface (as above), pick a value near
the coarse minimum, and set --minimum/--maximum for the resolution you want.
The sweep is produced by the
remesh_bunny_tolerance.py script.
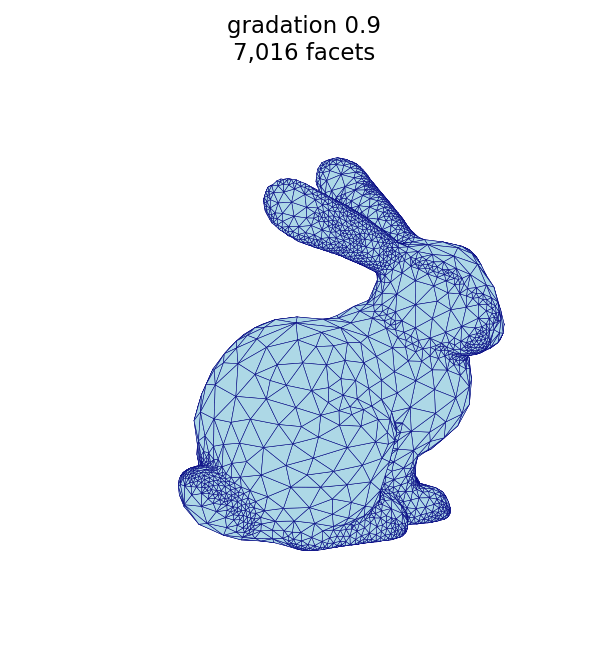
Adaptive size gradation (--gradation)
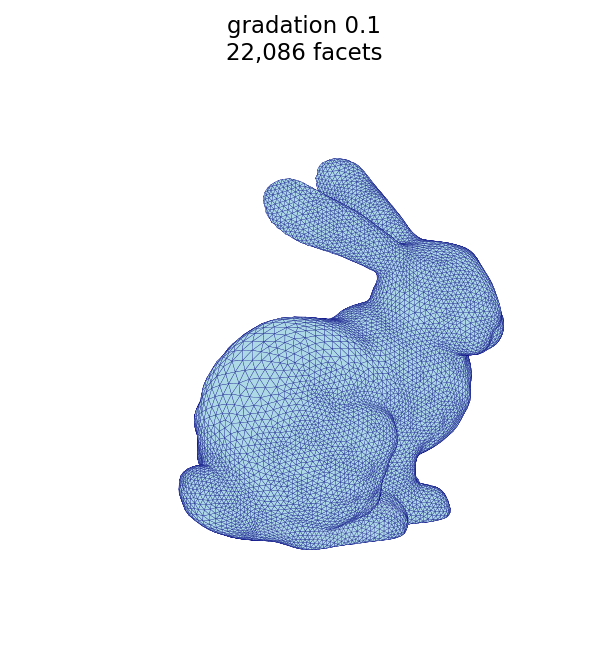
The gradation limits how quickly the target edge length may change between
neighbouring triangles. A small gradation forces a slow, smooth transition, so
the fine triangles near features spread outward across the surface (many more
facets); a large gradation allows a rapid transition, keeping the refinement
localized to the features (fewer facets). Using the same baseline as above
(--minimum 0.002 --maximum 0.040 -n 25 -t 0.02):
automesh remesh -i stanford_bunny.stl -o bunny_adapt_grad_lo.stl adaptive --minimum 0.002 --maximum 0.040 -n 25 -t 0.02 -g 0.1
automesh remesh -i stanford_bunny.stl -o bunny_adapt_grad_hi.stl adaptive --minimum 0.002 --maximum 0.040 -n 25 -t 0.02 -g 0.9
-g 0.1 — gradual (22,086 facets) | -g 0.9 — sharp (7,016 facets) |
|---|---|
 |  |
Parameters at a glance
| parameter | mode | effect |
|---|---|---|
--size | uniform | target edge length; smaller → more, smaller triangles |
--iterations | both | number of passes; more passes are needed to reach a coarse target from a dense input |
--minimum / --maximum | adaptive | bounds on edge length across the surface |
--tolerance | adaptive | curvature cutoff in the Dunyach formula; facet count is non-monotonic (coarsest at a mid-range value) |
--gradation | adaptive | rate the edge length may change between neighbours; smaller → more gradual (more facets), larger → sharper (fewer facets) |
Figure script
The figures on this page are produced by the following script, which reads each
STL surface and renders it with a matched camera (remapping the bunny's +y
up-axis so it stands upright).
r"""This module, remesh_bunny_figures.py, renders the Stanford bunny surface
triangulations used in the Stanford bunny remeshing example.  It reads the input
bunny and each remeshed output (produced by `automesh remesh`) and saves a
matched-camera PNG of every mesh.

The bunny's up-axis is +y; the renderer remaps model coordinates (x, y, z) to
plot coordinates (x, z, y) so the bunny stands upright.

Example
-------
source ~/autotwin/automesh/.venv/bin/activate
cd ~/autotwin/automesh/book/cli
python remesh_bunny_figures.py

Output
------
The `bunny_*.png` visualization files, written next to this script.
"""

import struct
from pathlib import Path
from typing import Final

import matplotlib.pyplot as plt
from mpl_toolkits.mplot3d.art3d import Poly3DCollection
import numpy as np
from numpy.typing import NDArray

# Shared "hero" view so only the triangulation changes between figures.
ELEV: Final[float] = 18.0
AZIM: Final[float] = 55.0
FACECOLOR: Final[str] = "lightblue"
EDGECOLOR: Final[str] = "navy"


def read_stl(path: Path) -> NDArray[np.float64]:
    """Reads triangular facets from a binary STL file, shape (n_facets, 3, 3)."""
    data = path.read_bytes()
    (n_facets,) = struct.unpack_from("<I", data, 80)
    facets = np.empty((n_facets, 3, 3), dtype=np.float64)
    offset = 84
    for i in range(n_facets):
        values = struct.unpack_from("<12f", data, offset)
        facets[i] = np.array(values[3:12]).reshape(3, 3)
        offset += 50
    # Remap (x, y, z) -> (x, z, y) so the bunny's +y up-axis points up in the plot.
    return facets[:, :, [0, 2, 1]]


def edge_lengths(facets: NDArray[np.float64]) -> NDArray[np.float64]:
    """Returns the length of every unique undirected edge in the mesh."""
    keyed = np.round(facets.reshape(-1, 3), 8)
    _, inverse = np.unique(keyed, axis=0, return_inverse=True)
    ids = inverse.reshape(len(facets), 3)
    seen = set()
    lengths = []
    for tri, (a, b, c) in zip(facets, ids):
        for (u, v), (p, q) in (((a, b), (0, 1)), ((b, c), (1, 2)), ((c, a), (2, 0))):
            key = (int(min(u, v)), int(max(u, v)))
            if key not in seen:
                seen.add(key)
                lengths.append(float(np.linalg.norm(tri[p] - tri[q])))
    return np.array(lengths)


def render_histogram(stl: Path, out_name: str) -> None:
    """Saves a histogram of the triangle edge lengths of the given mesh."""
    lengths = edge_lengths(read_stl(stl))
    fig, ax = plt.subplots(figsize=(6, 4))
    ax.hist(lengths, bins=40, color=FACECOLOR, edgecolor=EDGECOLOR)
    ax.axvline(
        lengths.mean(),
        color="crimson",
        linestyle="--",
        linewidth=1.5,
        label=f"mean = {lengths.mean():.4f}",
    )
    ax.set_xlabel("triangle edge length")
    ax.set_ylabel("count")
    ax.set_title(f"{stl.stem}: edge length distribution")
    ax.legend()
    png = stl.with_name(out_name)
    fig.savefig(png, dpi=150, bbox_inches="tight")
    plt.close(fig)
    print(f"wrote {png.name} ({len(lengths):,} edges)")


def render(stl: Path, title: str) -> None:
    """Renders a single bunny STL to a PNG next to it.  Dense meshes are drawn
    without edges (a shaded surface); coarse meshes show their triangle edges."""
    facets = read_stl(stl)
    n = len(facets)
    # Show triangle edges for all but the very dense input scan, which is drawn
    # as a shaded surface.  Thin the lines as the facet count grows.
    show_edges = n <= 40000
    linewidth = 0.25 if n <= 10000 else 0.12
    fig = plt.figure(figsize=(5, 5))
    ax = fig.add_subplot(111, projection="3d")
    surface = Poly3DCollection(
        facets,
        facecolor=FACECOLOR,
        edgecolor=EDGECOLOR if show_edges else "none",
        linewidths=linewidth if show_edges else 0.0,
        rasterized=True,
    )
    surface.set_alpha(1.0)
    ax.add_collection3d(surface)

    pts = facets.reshape(-1, 3)
    lo, hi = pts.min(0), pts.max(0)
    center = (lo + hi) / 2
    radius = (hi - lo).max() / 2
    for setter, c in zip((ax.set_xlim, ax.set_ylim, ax.set_zlim), center):
        setter(c - radius, c + radius)
    ax.set_box_aspect((1, 1, 1))
    ax.view_init(elev=ELEV, azim=AZIM)
    ax.set_axis_off()
    ax.set_title(f"{title}\n{n:,} facets", fontsize=11)
    png = stl.with_suffix(".png")
    fig.savefig(png, dpi=150, bbox_inches="tight")
    plt.close(fig)
    print(f"wrote {png.name} ({n:,} facets)")


def main() -> None:
    here = Path(__file__).resolve().parent
    figures = {
        "stanford_bunny": "input scan",
        "bunny_uniform_fine": "uniform, size 0.004",
        "bunny_uniform_coarse": "uniform, size 0.006",
        "bunny_iter_n5": "uniform 0.006, 5 iterations",
        "bunny_compare_uniform": "uniform, size 0.0036",
        "bunny_adaptive": "adaptive, 0.002-0.040",
        "bunny_tol_tight": "tolerance 0.0002",
        "bunny_tol_mid": "tolerance 0.002",
        "bunny_tol_loose": "tolerance 0.02",
        "bunny_adapt_grad_lo": "adaptive, gradation 0.1",
        "bunny_adapt_grad_hi": "adaptive, gradation 0.9",
    }
    for stem, title in figures.items():
        stl = here / f"{stem}.stl"
        if stl.exists():
            render(stl, title)
        else:
            print(f"skipping {stl.name} (not found)")

    # Edge-length histogram of the input scan.
    base = here / "stanford_bunny.stl"
    if base.exists():
        render_histogram(base, "bunny_edge_histogram.png")


if __name__ == "__main__":
    main()
Tolerance study script
The tolerance sweep plot is produced
by the following script, which remeshes the bunny at several --tolerance values
and records the facet count:
r"""This module, remesh_bunny_tolerance.py, studies how the adaptive
`--tolerance` affects the facet count of the remeshed Stanford bunny.

The adaptive edge length follows the Dunyach formula
``L = sqrt(6 * tolerance / curvature - 3 * tolerance**2)`` clamped to
``[minimum, maximum]``.  Because of the ``- 3 * tolerance**2`` term, the facet
count is *non-monotonic* in the tolerance: very small and very large tolerances
both refine the mesh, with the coarsest result in between.  This script sweeps
the tolerance at fixed ``--minimum``/``--maximum``/``--iterations`` and plots the
resulting facet count.

Example
-------
source ~/autotwin/automesh/.venv/bin/activate
cd ~/autotwin/automesh/book/cli
# `automesh` must be on the PATH (e.g. target/release)
python remesh_bunny_tolerance.py

Output
------
The `bunny_tolerance.png` plot, written next to this script, and a summary table
printed to the terminal.
"""

import os
import shutil
import struct
import subprocess
import tempfile
from pathlib import Path

import matplotlib.pyplot as plt

TOLERANCES = [0.0002, 0.0005, 0.001, 0.002, 0.004, 0.008, 0.02, 0.05]
MINIMUM, MAXIMUM, ITERATIONS = 0.002, 0.040, 25
FACECOLOR = "lightblue"
EDGECOLOR = "navy"


def automesh_binary() -> str:
    """Locates the `automesh` executable: the AUTOMESH environment variable, then
    the PATH, then the repository's target/release build."""
    candidate = os.environ.get("AUTOMESH") or shutil.which("automesh")
    if candidate:
        return candidate
    fallback = Path(__file__).resolve().parents[2] / "target" / "release" / "automesh"
    if fallback.exists():
        return str(fallback)
    raise FileNotFoundError(
        "could not find `automesh`; set AUTOMESH or add it to the PATH"
    )


def facet_count(stl: Path) -> int:
    """Reads the facet count from a binary STL header (bytes 80-84)."""
    with stl.open("rb") as file:
        file.seek(80)
        return struct.unpack("<I", file.read(4))[0]


def main() -> None:
    here = Path(__file__).resolve().parent
    source = here / "stanford_bunny.stl"
    automesh = automesh_binary()
    counts = []
    print(f"{'tolerance':>10} {'facets':>8}")
    with tempfile.TemporaryDirectory() as tmp:
        for tol in TOLERANCES:
            out = Path(tmp) / "t.stl"
            subprocess.run(
                [automesh, "remesh", "-i", str(source), "-o", str(out),
                 "adaptive", "--minimum", str(MINIMUM), "--maximum", str(MAXIMUM),
                 "-n", str(ITERATIONS), "-t", str(tol)],
                check=True, capture_output=True,
            )
            n = facet_count(out)
            counts.append(n)
            print(f"{tol:>10} {n:>8}")

    coarsest = TOLERANCES[counts.index(min(counts))]
    fig, ax = plt.subplots(figsize=(6, 4))
    ax.plot(TOLERANCES, counts, "o-", color=EDGECOLOR, markerfacecolor=FACECOLOR)
    ax.set_xscale("log")
    ax.set_yscale("log")
    ax.set_xlabel("--tolerance")
    ax.set_ylabel("facets")
    ax.set_title("Bunny facet count vs. adaptive tolerance")
    ax.axvline(
        coarsest, color="crimson", linestyle="--", linewidth=1.0,
        label=f"coarsest near {coarsest}",
    )
    ax.legend()
    ax.grid(True, which="both", alpha=0.3)
    png = here / "bunny_tolerance.png"
    fig.savefig(png, dpi=150, bbox_inches="tight")
    plt.close(fig)
    print(f"wrote {png.name}")


if __name__ == "__main__":
    main()
Helper: OBJ to binary STL
The Stanford bunny is distributed as an OBJ, but remesh reads binary STL. This
helper converts the downloaded OBJ to the stanford_bunny.stl used above:
r"""This module, obj_to_binary_stl.py, converts a triangular OBJ mesh into a
binary STL file.  `automesh remesh` reads binary STL (not OBJ), so the Stanford
bunny OBJ from Alec Jacobson's repository must be converted before use.

Example
-------
source ~/autotwin/automesh/.venv/bin/activate
cd ~/autotwin/automesh/book/cli
python obj_to_binary_stl.py stanford-bunny.obj stanford_bunny.stl
"""

import struct
import sys
from pathlib import Path

import numpy as np


def obj_to_binary_stl(source: Path, target: Path) -> None:
    """Reads a triangular OBJ and writes an equivalent binary STL."""
    verts: list[tuple[float, float, float]] = []
    faces: list[tuple[int, int, int]] = []
    for line in source.read_text().splitlines():
        tokens = line.split()
        if not tokens:
            continue
        if tokens[0] == "v":
            verts.append(tuple(float(x) for x in tokens[1:4]))
        elif tokens[0] == "f":
            # OBJ is 1-indexed; entries may be v, v/vt, or v/vt/vn. Fan-triangulate.
            idx = [int(p.split("/")[0]) - 1 for p in tokens[1:]]
            for k in range(1, len(idx) - 1):
                faces.append((idx[0], idx[k], idx[k + 1]))

    coords = np.array(verts, dtype=np.float64)
    with target.open("wb") as out:
        out.write(b"\0" * 80)  # 80-byte header (ignored)
        out.write(struct.pack("<I", len(faces)))  # facet count
        for a, b, c in faces:
            p, q, r = coords[a], coords[b], coords[c]
            normal = np.cross(q - p, r - p)
            length = np.linalg.norm(normal)
            normal = normal / length if length > 0 else normal
            out.write(struct.pack("<12fH", *normal, *p, *q, *r, 0))
    print(f"wrote {len(faces)} facets to {target}")


if __name__ == "__main__":
    if len(sys.argv) != 3:
        sys.exit("usage: python obj_to_binary_stl.py <mesh.obj> <mesh.stl>")
    obj_to_binary_stl(Path(sys.argv[1]), Path(sys.argv[2]))